> ## Documentation Index
> Fetch the complete documentation index at: https://doc.sensolus.com/llms.txt
> Use this file to discover all available pages before exploring further.

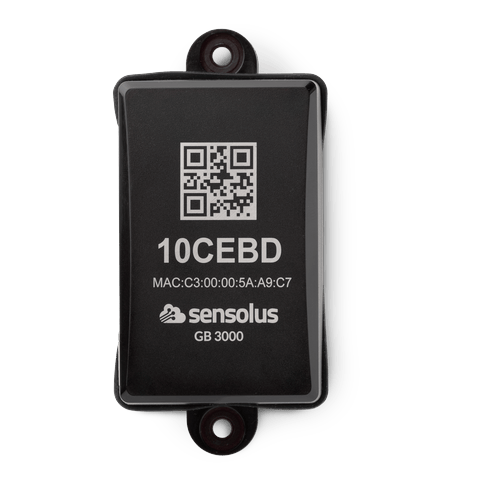
# GB 3000

> GB 3000

export const HeaderBadge = ({type, checkDms = false}) => {
  function addGroupBadge(h1Id) {
    const h1Element = document.getElementById(h1Id);
    if (!h1Element) {
      console.error(`Element with ID "${h1Id}" not found`);
      return;
    }
    if (h1Element.querySelector('.header-badge')) {
      console.warn('Header badge already exists on this element');
      return;
    }
    const badge = document.createElement('span');
    badge.className = 'header-badge';
    var badgeText;
    var badgeColor;
    switch (type) {
      case 'public':
        badgeText = 'Public';
        badgeColor = '#858585ff';
        break;
      case 'end-user':
        badgeText = 'End-User';
        badgeColor = '#0071a1';
        break;
      case 'multi-org':
        badgeText = 'Multi-Org';
        badgeColor = '#0071a1';
        break;
      case 'partner':
        badgeText = 'Partner';
        badgeColor = '#0071a1';
        break;
      case 'partner-pricing-eu':
        badgeText = 'Partner-EU';
        badgeColor = '#0071a1';
        break;
      case 'partner-pricing-us':
        badgeText = 'Partner-US';
        badgeColor = '#0071a1';
        break;
      case 'partner-pricing-world':
        badgeText = 'Partner-World';
        badgeColor = '#0071a1';
        break;
      case 'sensolus-internal':
        badgeText = 'Sensolus only';
        badgeColor = '#ffa858';
        break;
      default:
        badgeText = type;
        badgeColor = '#ffa858';
    }
    badge.textContent = badgeText;
    badge.style.cssText = `
        background-color: ${badgeColor};
        color: white;
        padding: 0.3em 0.8em 0.3em 0.8em;
        border-radius: 6px;
        font-size: 0.4em;
        margin-left: 20px;
        vertical-align: middle;
    `;
    h1Element.appendChild(badge);
  }
  function checkDocumentationServerAccess(type) {
    fetch('https://cloud.sensolus.com/documentation/user', {
      method: 'GET',
      headers: {
        'Accept': 'application/json'
      },
      credentials: 'include'
    }).then(response => {
      if (!response.ok) {
        console.error('Could not fetch documentation server user:', response);
      }
      return response.json();
    }).then(user => {
      const compatibleGroups = {
        "NORMAL": ["end-user", "public"],
        "PUBLIC": ["public"],
        "PARTNER": ["partner", "public", "end-user", "multi-org"],
        "MULTI_ORG": ["multi-org", "public", "end-user"],
        "SYSTEM": ["public", "end-user", "multi-org", "partner", "sensolus-internal"]
      };
      const allowedGroups = compatibleGroups[user.orgType] || [];
      const compatiblePriceListGroups = {
        "EU": ["partner-pricing-eu"],
        "US": ["partner-pricing-us"],
        "WORLD": ["partner-pricing-eu", "partner-pricing-us", "partner-pricing-world"]
      };
      allowedGroups.push(...compatiblePriceListGroups[user.orgType === "SYSTEM" ? "WORLD" : user.priceList] || []);
      if (!allowedGroups.includes(type)) {
        if (user.orgType === 'PUBLIC') {
          window.location.href = '/login?redirect=' + encodeURIComponent(window.location.pathname);
        } else {
          window.location.href = '/logout';
        }
      }
      addGroupBadge("page-title");
    }).catch(error => {
      console.error('Could not fetch documentation server user:', error);
      addGroupBadge("page-title");
    });
  }
  useEffect(() => {
    console.info("adding badge");
    addGroupBadge("page-title");
  });
  useEffect(() => {
    console.info("checking server access for type" + type);
    if (type && type !== 'public' && checkDms) {
      checkDocumentationServerAccess(type);
    }
  }, [type]);
  return <></>;
};

<HeaderBadge type={'public'} checkDms={false} />

<Frame>
  <img src="https://mintcdn.com/sensolus/t0riKfievr7ujfVb/docs/spec_sheets/infrastructure/images/GB-3000.png?fit=max&auto=format&n=t0riKfievr7ujfVb&q=85&s=7640d029cb8e9f6c5293fb238c4dbc5b" width="200" data-path="docs/spec_sheets/infrastructure/images/GB-3000.png" />
</Frame>

<AccordionGroup>
  <Accordion title="GB 3000 (pdf)" icon="file">
    **Description**: <br />
    **Access level**: public<br />
    **Reference**: SDOC-498608282-1366<br />
    **Download**:  [PDF](https://cloud.sensolus.com/documentation/dms/SDOC-498608282-1366)

    <iframe src="https://cloud.sensolus.com/documentation/dms/SDOC-498608282-1366?viewer=true" style={{width: '100%', height: '881px', border: 'none', margin: 0, padding: 0}} />

    <div style={{display: "none"}} data-pdf-text="true">
      GB 3000
      BLE Geobeacon
      [www.sensolus.com](http://www.sensolus.com) | [info@sensolus.com](mailto:info@sensolus.com)
      Battery-powered Bluetooth Low Energy beacon for
      indoor asset tracking and zone accuracy optimization.
      Compatible with all Sensolus trackers equipped with
      BLE localization, featuring user-replaceable batteries
      and extended battery life.
      Bluetooth Low Energy
      5 years battery life
      IP65 rated
      95 × 45 × 24.5mm
      70g (2.5 oz) with batteries
      Connectivity
      Technology
      Bluetooth Low Energy (BLE) beacon
      Transmission Range
      •
      Up to 100 meters maximum range
      •
      \~30 meters standard for indoor geolocation
      Compatibility
      Compatible with all Sensolus BLE-equipped trackers
      Antenna
      Onboard PCB antenna
      Physical Characteristics
      Dimensions
      95 × 45 × 24.5mm (3⁴⁷⁄₆₄ × 1⁴⁹⁄₆₄ × 1 in)
      Weight
      70 grams (2.5 oz) with two batteries
      Color
      Black
      IP Rating
      IP65
      Power
      Power Source
      Two user-replaceable AA lithium batteries
      Battery Life
      Approximately 5 years (depending on operating mode)
      Mounting
      Installation Methods
      •
      Double-sided adhesive tape
      •
      Bolts/screws
      •
      Mounting hardware
      Recommended Orientation
      Vertical or horizontal with back facing mounting surface
      Mounting Height
      Minimum 1.8 meters above ground (as high as possible)
    </div>
  </Accordion>

  <Accordion title="GB 3000 Installation and Activation Manual (pdf)" icon="file">
    **Description**: <br />
    **Access level**: public<br />
    **Reference**: SDOC-498608282-1374<br />
    **Download**:  [PDF](https://cloud.sensolus.com/documentation/dms/SDOC-498608282-1374)

    <iframe src="https://cloud.sensolus.com/documentation/dms/SDOC-498608282-1374?viewer=true" style={{width: '100%', height: '881px', border: 'none', margin: 0, padding: 0}} />

    <div style={{display: "none"}} data-pdf-text="true">
      GB 3000 Installation and Activation Manual
      [www.sensolus.com](http://www.sensolus.com) | [info@sensolus.com](mailto:info@sensolus.com)
      February 3, 2026
      The GB 3000 is a Geobeacon that enables indoor geolocation for your tracked assets. This manual covers the physical
      installation and platform activation process.
      Once you have activated a Geobeacon, it MUST be associated with a correct location in the Sensolus platform. Failing to
      do so may result in trackers not being able to determine their location anymore.
      Step 1: Place the batteries
      Take all parts out of the plastic
      bag.
      Open the geobeacon.
      Add the extra battery to the
      geobeacon.
      Close the geobeacon with the
      small black screws.
      Step 2: Get the serial number
      Make sure to write down the serial number of the Geobeacon as you will need it later for platform registration.
      Step 3: Choose a location

      GB 3000 Installation and Activation Manual
      [www.sensolus.com](http://www.sensolus.com) | [info@sensolus.com](mailto:info@sensolus.com)
      February 3, 2026
      Identify the area in which your assets need to be geolocated using this Geobeacon and place the Geobeacon in the middle of
      that area.
      Step 4: Install the geobeacon
      The GB 3000 can be mounted using screws or double-sided tape.
      Install with screws: Use the closing cap, screw, and dowel. The holes
      are 5 mm and spaced 83 mm apart.
      Install with double-sided tape: Apply tape to the back of the
      geobeacon and press firmly against the mounting surface.
      Step 5: Verify if the geobeacon works

      GB 3000 Installation and Activation Manual
      [www.sensolus.com](http://www.sensolus.com) | [info@sensolus.com](mailto:info@sensolus.com)
      February 3, 2026
      Use the Beaconset+ app to verify that the BLE advertisements are discoverable. You will see the Geobeacon serial number in
      the list. Move around to verify the covered area.
      -------------------------------------------------

      BLE signals and range
      Sensolus Geobeacons use BLE signals. Water and metal surfaces reflect the Bluetooth signals. Always test the devices in real
      life circumstances for optimal installation.
      Range: Depending on the configured signal strength, the Geobeacon will cover an area between 2 meter and 100 meter radius.
      For indoor geolocation, the standard range is around 30 meters.
      Installation advice
      Height: Install the geobeacon as high as
      possible, minimum 1.8 meter above the
      ground.
      Position: A Geobeacon is a fixed device that
      should always remain at the same location.
      Orientation: Geobeacons are mounted
      vertically or horizontally with the back facing
      the mounting surface. All other installations
      are not recommended.
      --------------------

      Activation in the platform
      Once your Geobeacons are properly installed, you need to register and configure them in the Sensolus platform.

      GB 3000 Installation and Activation Manual
      [www.sensolus.com](http://www.sensolus.com) | [info@sensolus.com](mailto:info@sensolus.com)
      February 3, 2026
      Sign in to the Sensolus platform and go to Admin → Infrastructure. If your Geobeacons have been pre-assigned to your
      account, you will see their serial number in the list.
      Go to the geobeacon you want to configure and edit the settings to give it a useful name.
      Edit the location:

      GB 3000 Installation and Activation Manual
      [www.sensolus.com](http://www.sensolus.com) | [info@sensolus.com](mailto:info@sensolus.com)
      February 3, 2026
      • Type in the approximate address in the search bar and zoom in until you can recognize the place where you physically
      mounted the Geobeacon.
      • Click Add geobeacon location and a marker will appear.
      • Move the marker until it shows the exact place where you installed the Geobeacon.
      • Click Save to finish.
      Make sure that your trackers are configured to scan for Geobeacons. This can be done in the tracker configuration page, or
      Sensolus support can assist with this.
    </div>
  </Accordion>

  <Accordion title="3D-file GB 3000 (stp)" icon="file">
    **Description**: 3D-file for GB 3000 in STP format<br />
    **Access level**: end-user<br />
    **Reference**: SDOC-498608282-695<br />
    **Download**:  [STP](https://cloud.sensolus.com/documentation/dms/SDOC-498608282-695)
  </Accordion>
</AccordionGroup>
