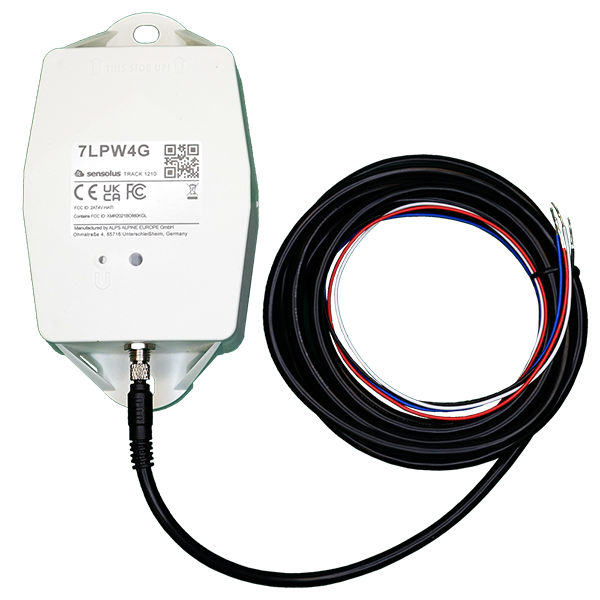
**Description**: Installation manual of TRACK 1210.
**Access level**: end-user
**Reference**: SDOC-498608282-1041
**Download**: [PDF](https://cloud.sensolus.com/documentation/dms/SDOC-498608282-1041)
[www.sensolus.com](http://www.sensolus.com) | [info@sensolus.com](mailto:info@sensolus.com)
August 18, 2025 3:52 PM
Installation and activation manual TRACK 1210
1. Activation of the tracker
Hold a magnet for about 5
seconds on top of the logo on the
tracker.
You will first see a red LED. Do
not remove the magnet yet.
When the green LED is blinking
you can remove the magnet. The
tracker is ready for use.
Activation of the tracker is preferably done with clear skies, and not inside (e.g. factory or warehouse).
Trackers are not activated when delivered to your premises. Their subscription in the platform will start within six month of purchase.
Activation troubleshooting
Activating a tracker that communicates over the NB-IoT network can sometimes come with a delay.
With a delay we mean that the online status doesn\'t appear within 5 minutes after holding the magnet to the tracker.
This is mostly due to conditions on the network operator site.
If the activation wasn\'t successful after 5 minutes the tracker will try again to activate again after waiting 24 hours.
This long period of time is often an obstacle to start installing trackers to assets and makes the timing of the installation of the trackers
cumbersome as it is important to only install trackers when they appeared as online on the platform.
To overcome to 24 hours waiting time, you can do the following:
if after 5 minutes of waiting and the status didn\'t change yet to "online\'\' hold the magnet again for 5 seconds on top of the tracker to enforce a
new attempt for activation. Keep trying every 5 minutes until the Online status appears.
[www.sensolus.com](http://www.sensolus.com) | [info@sensolus.com](mailto:info@sensolus.com)
[www.sensolus.com](http://www.sensolus.com) | [info@sensolus.com](mailto:info@sensolus.com)
August 18, 2025 3:52 PM
August 18, 2025 3:52 PM
6\. Force new configuration download on the tracker
Hold a magnet for about 5
seconds on top of the logo on the
asset tracker.
You will see a green LED.
You will see a red and green LED.
Now remove the Magnet
Green LED is blinking for
minimum 30 seconds.
Your tracker is checking for new
configurations
You see a green LED: New
configuration setting received
You see a red LED:
No new configuration received.
A firmware can be uploaded on the zone anchor. Queue the firmware in the Sensolus platform first.
4\. Fuse installation
An additional fuse (> 500mA and \< 1A) can be installed.
Install the fuse on the voltage in red cable in series.
The tracker has an internal fuse, see specsheet for details.
The external cable is composed of 4 internal wires:
•
Black: GND / Ground. Connect to black battery terminal (negative, minus sign).
•
Red: VIN External voltage in. Connect to red battery terminal (positive, plus sign).
•
Blue: Digital In / Analog In (not in use currently; pending a future firmware release at unknown date).
•
White: Digital Out. (not in use currently; pending a future firmware release at unknown date).
Put the cable onto the connector.
Only the black plastic piece will
go into the connector. Do not
force this.
Tighten the connection by gently
screwing the cable into the
connector. Do not force this as
well.
5\. Connect tracker to the vehicle power source.
You can add any connector to the
end of the TRACK 1210 power
connector wires.
We recommend using heat shrink
tubing on the end of the cables.
Check if the power cable is
connected well.
2\. General installation advice
Avoid blocking the tracker’s view
with thick metal or carbonfibre
walls. They weaken or block the
radiofrequency signals.
Install the tracker vertically, with
the logo facing up.
Place the tracker has high as
possible on the asset to ensure
good network coverage.
Make sure the tracker has a clear
view on the sky.
Do not install the tracker on parts
that receive frequent shocks or
vibrations.
If your asset is handled in a
rough environment, you can
place the tracker in a protected
location, but never with metal or
carbonfibre above the tracker.
Avoid placing the tracker in a
place that can collect water.
Make sure the mounting surface
is flat and clean, for a strong and
durable bond.
Guidelines for mounting methods for the tracker can be found in the Sensolus documentation center.
Mount the tracker in such a way you have good access and a good view to the power plug of the tracker.
3\. Mount the tracker onto the vehicle
[www.sensolus.com](http://www.sensolus.com) | [info@sensolus.com](mailto:info@sensolus.com)
August 18, 2025 3:52 PM
7\. Troubleshooting the tracker
1. Put the magnet on the tracker for less than 5 seconds
2. The possible LED feedback options are:
Red LED:
Tracker is not activated
Green LED:
Tracker is activated and working
properly
No LED:
tracker is not functioning
(probably dead battery -> contact
support)
Red LED is blinking:
Tracker is busy
3. Installation for shock detection
For shock sensing the installation of the way the tracker is installed is important.
Testing on real assets is required before you can use the embedded shock sensor.
4. Installation for trailers and cooling trucks
Place the tracker as high as possible on the asset to ensure good network coverage.
Do not install on the chassis or parts with heavy vibration.
**Description**: End-of-life notification for the TRACK 1210 and ZA 3510
**Access level**: partner
**Reference**: SDOC-498608282-1318
**Download**: [PDF](https://cloud.sensolus.com/documentation/dms/SDOC-498608282-1318)
Ghent, 12/dec, 2025
Dear Partner, Valued Customer,
This letter is the official notification that the following products will be discontinued as
detailed below:
Product types:\
TRACK 1210 Vehicle tracker with external power option (NB-IOT only)
ZA 3510\
Zone Anchor with external power option (NB-IOT only)
Reason / background:
End-of-Life of the product has been decided by product management. They are
replaced by the NB-IOT/LTE-M combo products (see below).
Replacement products:
TRACK 1215 Vehicle tracker with external power option (NB-IOT/LTE-M)
ZA 3515\
Zone Anchor with external power option (NB-IOT/LTE-M)
Thank you for reviewing the above information. Should you have any questions, please
contact the Sensolus representative in your area.
Johan Criel\
CTO and Product Lead at Sensolus
**Description**:
**Access level**: public
**Reference**: SDOC-498608282-1340
**Download**: [PDF](https://cloud.sensolus.com/documentation/dms/SDOC-498608282-1340)
TRACK 1210
GNSS/Wi-Fi/BLE - NB-IoT
[www.sensolus.com](http://www.sensolus.com) | [info@sensolus.com](mailto:info@sensolus.com)
The rugged low-power tracker can be wired to an
external power source. It has NB-IoT connectivity and
guaranteed data recovery. The tracker provides
general localization, zone and high precision. The
tracker comes with an onboard temperature sensor
and shock detection. Compatible with multiple
external environmental sensors. The tracker firmware
can be upgraded over the air.
GNSS
Wi-Fi scanning
Bluetooth geobeacon for zone precision
NB-IoT
Europe and North America
Data recovery
Up to 12 years of back up battery
IP67
IK 09
Flame retardant
130×72×36 mm
212g (7.6 oz)
Connectivity
NB-IoT
•
Energy efficient transceiver
•
Internal omnidirectional antenna
•
Bi-directional communication
•
NB-IoT bands: Europe and North America
•
Data recovery
•
OTA firmware upgrade (NB-IoT)
Bluetooth Low Energy (BLE)
Bluetooth Low Energy 5.0
Geolocalization
GNSS
Multi GNSS constellation chipset (GPS+GALILEO)
BLE
•
Sensolus proximity beacon detection
•
Detectable by zone and high precision anchors
Wi-Fi scanning
•
Wi-Fi based geolocalization
•
Wi-Fi 2.4 GHz
TRACK 1210
GNSS/Wi-Fi/BLE - NB-IoT
[www.sensolus.com](http://www.sensolus.com) | [info@sensolus.com](mailto:info@sensolus.com)
Sensing
Internal
•
Activity monitoring
•
Orientation monitoring
•
Virtual tamper detection
•
Temperature monitoring
•
range: -20°C till 60°C (-4°F to 140°F)
•
typical accuracy: +/- 0.25°C (+/- 0.45°F)
•
worst case accuracy: +/- 1°C (+/- 1.8°F)
•
Configurable shock detection
Connectable environmental BLE sensors
•
Temperature, humidity
•
Fill level, contact, magnet
•
Other BLE sensors can be added
Activation and mounting
•
Activation manual
•
Holes 7x9mm (⁹/₃₂ \* ²³/₆₄ in) for screws or rivets. 115 mm
(4¹⁷/₃₂ in) distance between the centers of the mounting
holes.
•
Instructions for mounting the device can be found here.
Mechanics & Design
Antennas
All antennas are internal
Water & dust resistance
IP67
Size
130x72x36 mm
(5⅛ x 2⁵³⁄₆₄ x 1²⁷⁄₆₄ in)
Impact resistance
IK09
Weight
218 gram (7.68 oz) without cable
Drop shock and vibration
EN 60068
Color
White and black
Operating temperature
-20°C to 60°C
(-4°F to 140°F)\*
The specifics regarding operational temperature are contingent upon the
application, installation circumstances, and environmental factors such as
sunlight exposure. For further information, please reach out to Sensolus.
Battery life can be affected when devices function for extended periods at the
extremes of this range.
Casing
•
PBT/PC 29 TM-Z2 FR UV LS
•
Flame retardant
•
UV-stabilized
TRACK 1210
GNSS/Wi-Fi/BLE - NB-IoT
[www.sensolus.com](http://www.sensolus.com) | [info@sensolus.com](mailto:info@sensolus.com)
Power supply
Voltage
Input voltage: 10 - 30 V DC with overvoltage protection
Typical power consumption
\~3mA (idle)
Cable terminations
Connectors to the power source can be soldered to the cable
ends
Max typical power consumption
•
300mA (@10V)
•
70mA (@30V)
Fuse recommendations
•
\> 500mA and \< 1A fuse
•
The TRACK1210 contains a non-resettable 1A slow blow
fuse (Bel fuse 0685T1000) at its external power input.
Back up battery
Standard 3 cell
•
Battery life depending on operating mode.
•
User replaceable battery pack (Li-SoCl₂) 12000 mAh
•
2.94 gram (0.1037oz) lithium
Certifications
Regulatory
•
CE
•
FCC
•
IC
Bluetooth 5.0
Declaration ID D068598
Environmental
Drop shock
Electrical safety
EN 62368-1
User Interaction
Device activation
Magnetic activation
LED feedback
Green & red LED feedback on the device
Synchronize remote settings
•
Instant: Magnet activation
•
Periodic: No user interaction needed
Management Services
Diagnostics
•
Battery lifetime prediction
•
Detailed energy consumption
•
Geolocation diagnostics
•
Installation
•
Communication quality
Management
•
OTA firmware updates over NB-IoT and BLE
•
Remote configuration
•
Tracker usage profiles
•
External environmental sensors
TRACK 1210
GNSS/Wi-Fi/BLE - NB-IoT
[www.sensolus.com](http://www.sensolus.com) | [info@sensolus.com](mailto:info@sensolus.com)
Application services
•
Localization
•
Journeys
•
Activity
•
Utilization
•
Connectable with environmental sensors
•
Temparture detection
•
Tilt detection
•
Shock detection
Firmware configuration
Communication service
•
Data recovery strategy
•
Communication conditions
Location service
•
Motion based,context based, periodic or scheduled
•
Configurable update rate and journey detection
•
Priority sequence (GNSS, Wi-Fi scanning , Bluetooth
geobeacon)
•
GNSS fix parameters
•
Indoor detection algo
•
Wi-Fi scan strategy
•
BLE scan strategy
General configuration
•
Rule engine configuration
•
Diagnostic levels
•
Boot methods
•
Accurate time synchronization
Orientation service
Orientation detection parameters
Environmental sensing
•
Polling and aggregation strategy
•
Alerts
•
Edge processing parameters
Activity service
Activity detection parameters
Tamper service
Virtual tamper algo configuration
Shock detection
Shock algo detection parameters
Security
•
Device unique encryption keys
•
End to end payload encryption Chacha 20
•
AES encrypted firmware
•
Firmware upgrade allows only signed firmware images
Accesories
CAB 8600: 6 m power cable for TRACK 1210
For installation instructions, see [Installation instructions](/docs/spec_sheets/installation_instructions).
## TRACK 1210 cable wiring
### External power source - cable wiring
The cable provided with TRACK 1210 has a length of 2 meters. The cable allows connecting the TRACK 1210 to a power source of a vehicle (car / truck / trailer battery).
A cable of 6 meters can be purchased separately.